Since our last release, we’ve focused on one thing: helping you get from model to decision with less friction.
AnyLogic Cloud 2.6.0–2.7.0 makes experiments easier to run and easier to read. So, you can understand progress and results faster without digging through details. Multi-run experiments execute more efficiently, and Private Cloud administration becomes simpler and cleaner to maintain.
Below, we walk through the key changes using the “Activity Based Costing Analysis” model so you can try everything in a real model and apply it to your own work right away.
Contents:- Experiment and completed runs view improvements
- Faster execution of parameter variation and Monte Carlo experiments
- Private Cloud installation and administration improvements
- Final thoughts
Experiment and completed runs view improvements
We introduced some improvements in the experiment dashboards and completed runs view:
- Completed runs view now displays a total number of completed runs.
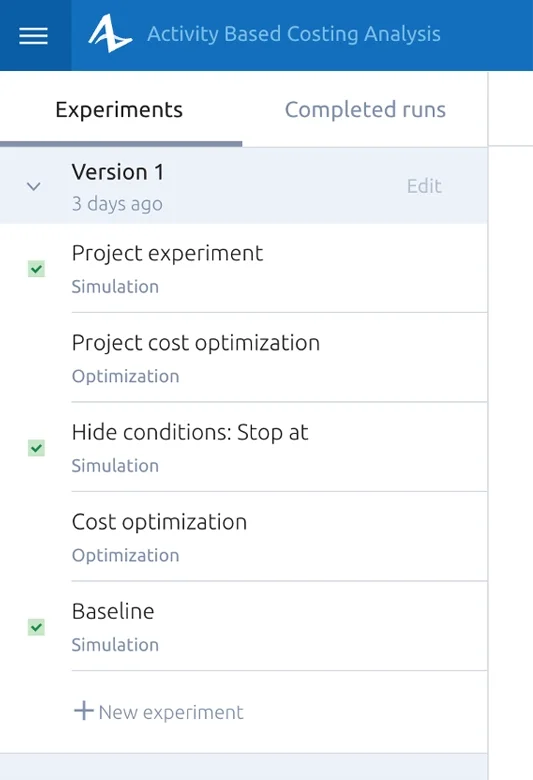
- Completed experiments (whether they ended with an error or not) show their status in the sidebar.
- Optimization and Optimization with replication experiments support constraints.
- All experiments support hide conditions for input widgets.
- Faster execution of Parameter variation and Monte Carlo experiments.
Let’s walk through these improvements using the “Activity Based Costing Analysis” example model. If you are an experienced user, you may quickly walk through the features in this copy of the model or any of your models. If you are a beginner, please follow the step-by-step instructions.
Open AnyLogic example models, click Help – Example models, and open the “Activity Based Costing Analysis” model. Then go to run configuration element and drag and drop Resource A capacity as well as Resource B capacity parameters to the Inputs column, and upload the model to AnyLogic Cloud.
Completed runs counter and experiment status
In AnyLogic Cloud, open your model. You will find a non-completed simulation experiment and a completed runs tab with 0 completed runs.
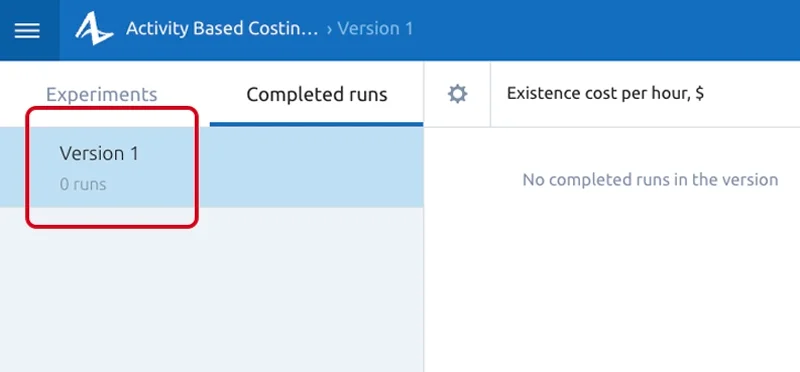
Run the simulation experiment and check the views again. As expected, we will see the “1 run” counter value in the completed runs sidebar and a green check mark in the experiment sidebar.
The completed runs counter is displayed per version; in this way, you can easily figure out how many runs have been completed in each version without opening the detailed view. In the same way, the runs status is displayed for every experiment: a green check if it completed successfully or a red exclamation mark if it completed with an error.
Constraints
Create a new optimization experiment and look at the improvements: constraints and hidden conditions. Click New experiment, choose Optimization experiment type, and optionally specify a custom name for the experiment.
After the experiment is created, open the dashboard editor. Enable a Discrete range for Resource A capacity, Resource B capacity and Continuous range for Mean processing time inputs. In the Outputs section, click the Add output button, select Single value in the new output widget, and choose Resource A capacity from the Select input dropdown. Then add an output widget for Resource B capacity and Mean processing time. Optionally, you may drag and drop these outputs in the beginning of the Outputs section.
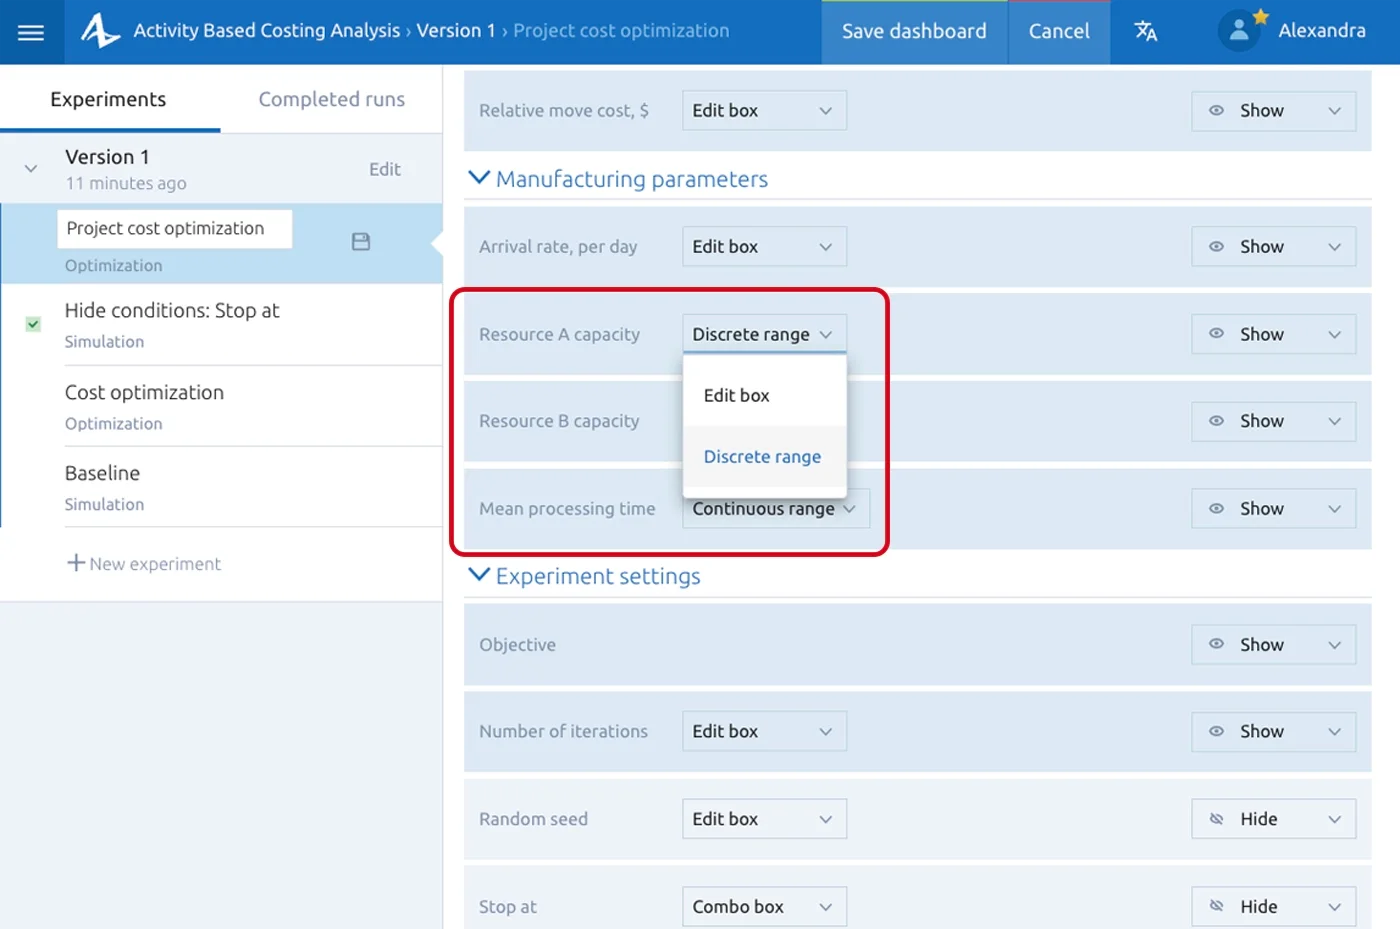
Now, save the dashboard, and set the following values:
- for both Resource capacity inputs: Min: 1; Max: 20; Step: 1;
- for Mean processing time input: Min: 1; Max: 15.
Finally, define the objective Output total cost per product, $ as Minimize, and set the number of iterations to 500. Now, run the experiment!
The results should be as follows:
- “Resource A capacity”: 3
- “Resource B capacity”: 4
- “Mean processing time”: 2.778
- “Output total cost per product: $”: 55.
Now both experiments in the sidebar have completed status.
The sum of Resource A capacity and Resource B capacity equals 7. Let’s say we have a capacity constraint; the sum of capacities should not exceed 5. Such constraint can be calculated before the start of the model run since the capacity is model input, not output. That means you can configure the optimization experiment to skip the runs that violate the constraint.
To configure constraints, open the dashboard editor of the optimization experiment, and click +Add constraint.
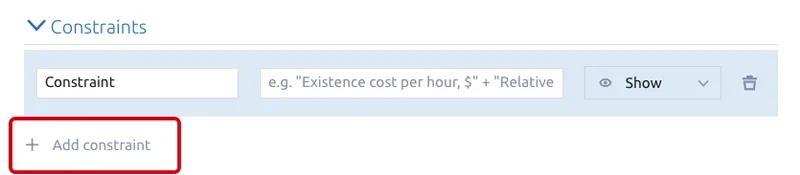
In the new element you may specify the constraint name and the expression used to calculate the constraint value. You can reference experiment numeric inputs in the expression. To open the dropdown list of available inputs, type the “ mark.
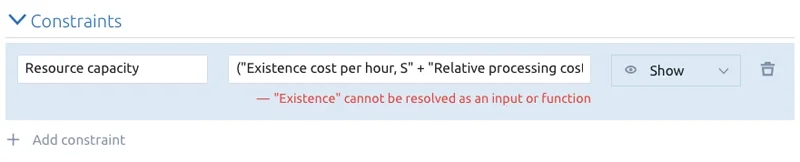
You may start typing after entering the quotation mark to see the inputs matching the entered text. Besides the input names, you may also use various constants and functions listed in the documentation. The input names must be enclosed in quotes, while functions and constants must be typed without the quotes. The allowed operations:
- addition (+)
- subtraction (-)
- multiplication (*)
- division (/)
- remainder of division (%)
- exponentiation (^)
You may use parentheses () to define the order of operations. The expression is validated upon exit from the expression edit box. If validation fails, you will see an error message.
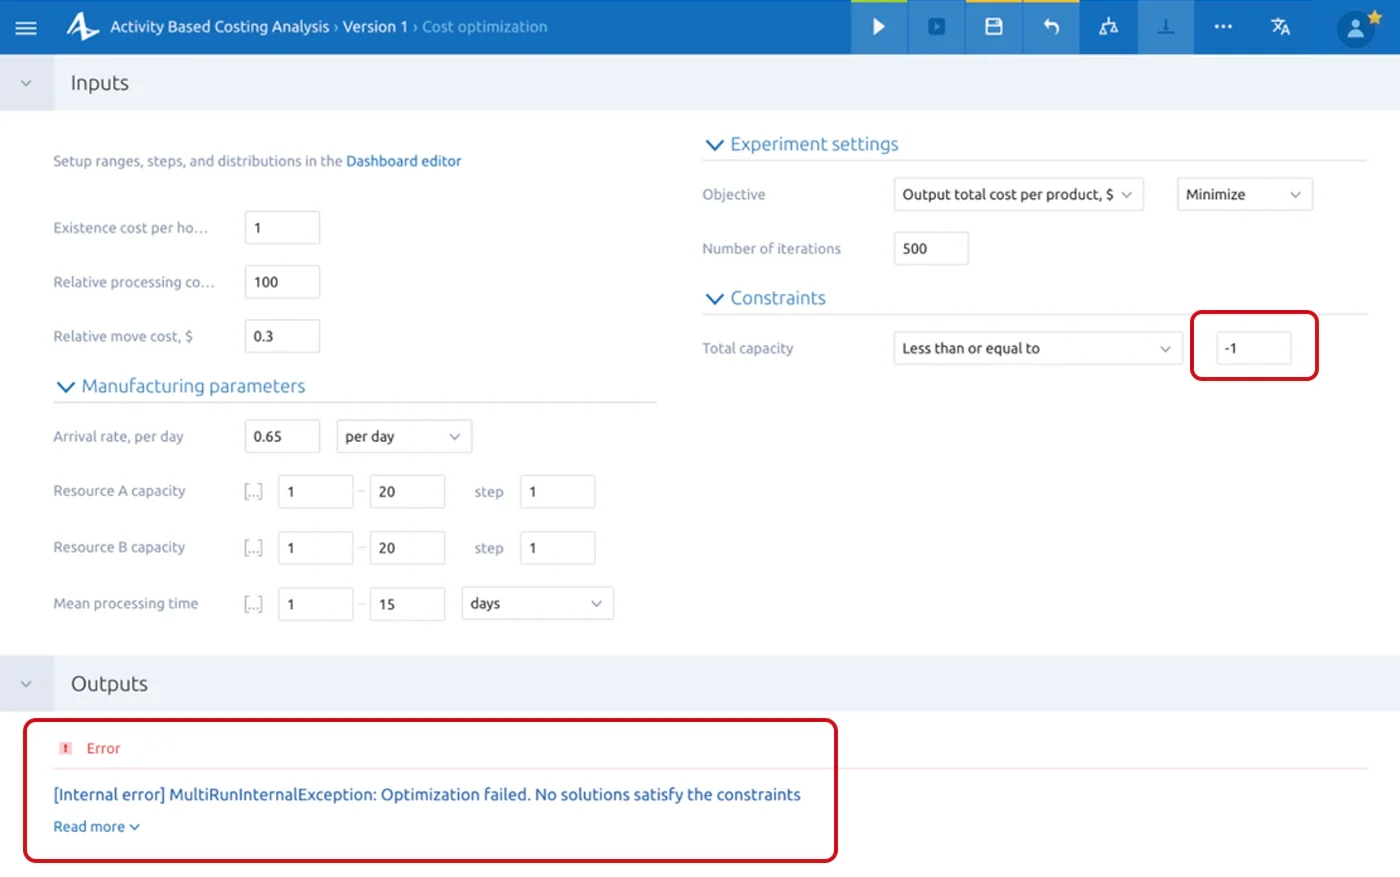
Back to resource capacities: enter the simple sum of Resource A capacity and Resource B capacity, name the constraint Total capacity, and save the dashboard. In the experiment dashboard, you’ll see the new constraint listed with its condition. By default, constraints are not restricted, but you can set limits. For example, set Total capacity to be less than or equal to 5.
Now you can run the experiment, and the experiment results should be as follows:
- Resource A capacity: 2
- Resource B capacity: 3
- Output total cost per product, $: 57
The constraints have been respected. If all the experiment runs violate the constraints, you will see an error message “No solution satisfies the constraints.”
Note: Since AnyLogic Cloud stores the completed runs results, you don’t need to run the experiment again if you disable the constraint by selecting “Not restricted.” The results will be taken from the AnyLogic Cloud database.
Hide conditions
As you may know, in AnyLogic 8 (desktop model editor), the parameter object has a hide conditions property. It hides parameter A in the properties panel in case another parameter has (or does not have) a specific value. For instance, if you drag and drop a Source block onto the canvas and change its Arrivals defined by property value from Rate to Interarrival time, the Rate property disappears and the Interarrival time property appears.
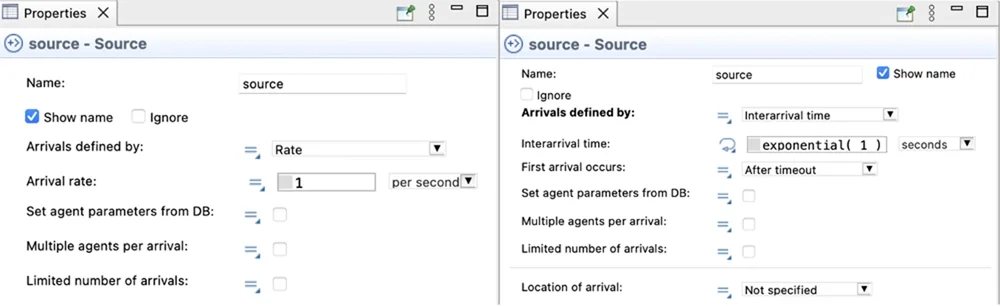
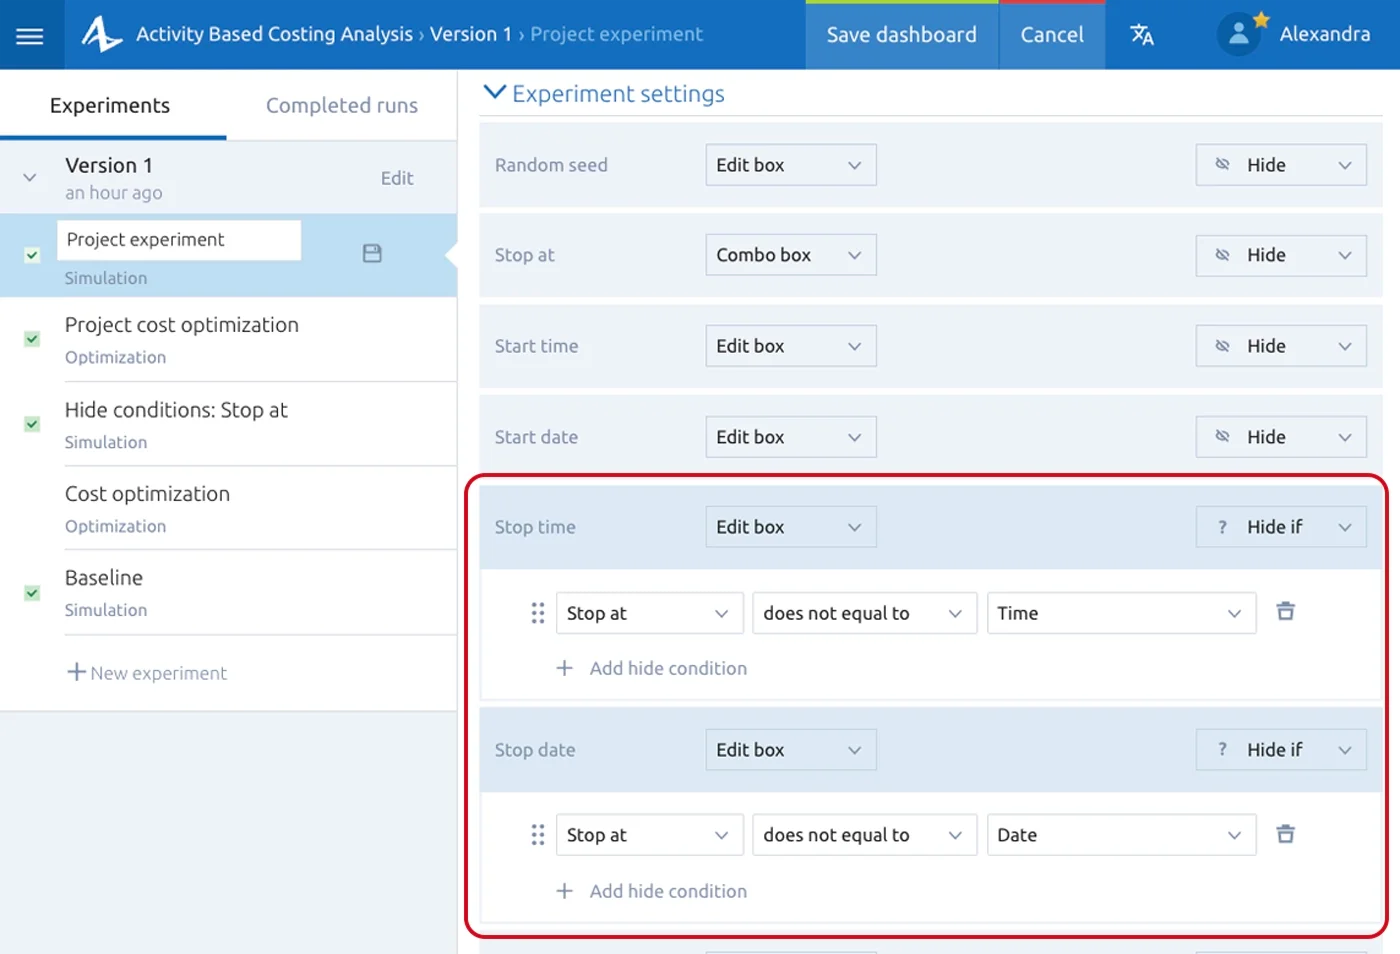
Since AnyLogic 2.7.0, you may define hide conditions for input widgets. Let’s make a hide condition in the “Activity based cost analysis” model. We will show widgets for setting stop time or stop date. Visibility of stop time or stop date is defined with the value of Stop at the widget. So, follow the steps:
- Create a new simulation experiment.
- Open the dashboard editor and go to Experiment settings.
- Find the Stop time widget and select the Hide if option.
- Click Add hide condition and set Stop at – Does not equal to – Time.
- Find the Stop date widget and select the Hide if option.
- Click Add hide condition and specify the condition Stop at – Does not equal to – Date.
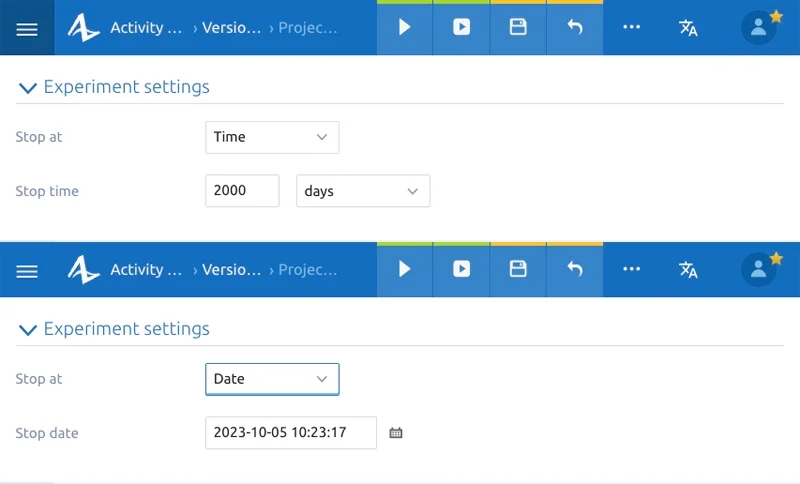
Now, save the dashboard and change the Stop at value from Time to Date. You will see the Time input disappears and the Date input appears.
Just like in AnyLogic 8, you can add several conditions, and any fulfilled condition hides the input. Also, you may change the order of hide conditions. This does not affect the result, but it can make them more readable.
We hope this improvement helps you create more convenient dashboards for your simulation models.
Faster execution of parameter variation and Monte Carlo experiments
Since AnyLogic Cloud serves multiple users who run multiple experiments at a time, there is a balancing algorithm that does not allow a single user to occupy all the execution nodes.
In previous versions, the algorithm did not consider a single run real-time duration. It formed fixed-size batches of up to 20 single runs.
A batch is a group of single runs executed at the same node.
This worked well when a single run took more than a few seconds, but it performed poorly when single runs were very short (like 0.1 seconds).
For example, if we run a Monte Carlo experiment with 500 iterations (single runs), then a single-core desktop will complete the experiment in 500 * 0.1 = 50 seconds (5 seconds at a 10-core desktop). The old AnyLogic Cloud algorithm executed the same experiment in ~2 minutes. The reason is the old algorithm generated 8 initial batches in parallel, then generated a new batch every 5 seconds. In this case, the total time became 0.1 * 20 + 340 / 5 = 70 seconds.
In AnyLogic Cloud 2.7.0, we replaced the old algorithm; now it considers single run duration when calculating the batch size, and here’s how it works:
- If the model version has < 10 completed runs, then AnyLogic Cloud executes the initial batch with size = 10 single runs.
- Using completed runs data, AnyLogic Cloud calculates the median single run duration and calculates the max batch size equal to the maximum number of single runs executed within 30 minutes.
- AnyLogic Cloud then creates several batches depending on internal configuration and available free nodes. Usually, 6 batches are executed in parallel.
Let’s throw back to our example: the initial batch of 10 runs was completed in 1 second. The median real duration of a single run is 0.1 seconds; the rest of the 490 runs are expected to take 490 * 0.1 = 49 seconds. These 490 runs are distributed across 6 batches, resulting in ~82 runs per batch. One batch completes in 82 * 0.1 = 8.2 seconds, so the execution takes 1 + 8.2 = 9.2 seconds.
In these calculations, we do not consider other time losses such as batch preparation and other collateral time losses, so the total time for this experiment should be around 25 seconds. In other words, we improved ~3 times the total time required to execute the experiment, which is a great result!
In the next releases, we plan to optimize the batch preparation procedures and further improve the execution of such experiments.
You can learn more about this algorithm and other details of experiment execution balancing in the AnyLogic Cloud architecture guide. AnyLogic Private Cloud customers can tune the algorithm for their own needs by editing the multi-run.json configuration file.
Private Cloud installation and administration improvements
For Private Cloud users there are two major updates:
- Since Private Cloud 2.6.0, we have provided a single installer for all Private Cloud editions: Private Cloud Lite, Private Cloud Pro, and Private Cloud Enterprise. The product edition is defined upon the product activation with the license leased from your AnyLogic License Server instance.
- The resources of deleted models are now completely removed from the storage after the preconfigured grace period.
Let’s see these changes in detail!
Single installer for Private Cloud
Prior to AnyLogic Private Cloud 2.6.0, you had to download a specific Private Cloud edition. To migrate from one edition to another, e.g., from Lite to Pro, you had to download another installer and run an update installation.
Since 2.6.0, all you need to switch from Lite to Pro is to drop the Private Cloud Lite license and lease the Private Cloud Pro license from your instance of AnyLogic Team License Server (version 3.4 or newer is required). You can check your edition and license in the Private Cloud administrator panel (see also Team License Server documentation for managing licenses).
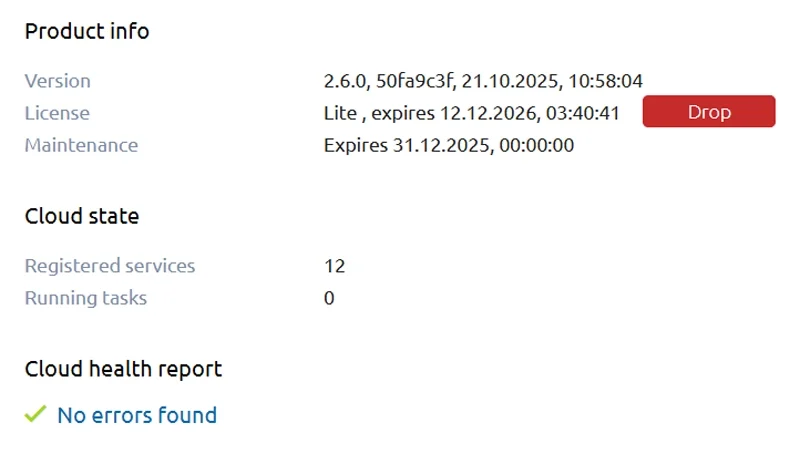
Lite, Pro, and Enterprise features have not been changed; we simply moved edition selection from the product itself to the leased license. You can learn more about the editions at the About AnyLogic Cloud page.
Removal of unused resources
Another major new feature is complete removal of the resources of deleted models. We are sure most Private Cloud customers make backups regularly, and here comes the problem – backups store all the data and resources, including deleted models. It is good practice since you can always restore models deleted accidentally. However, if the resources are never cleaned up, the backup size may grow almost infinitely.
We addressed this in AnyLogic Private Cloud 2.7.0 by introducing a garbage-collection-like mechanism. Deleted models and their resources are permanently removed automatically after a grace period, which can be configured in applications.json. By default, the grace period is 1 week, and you may adjust it using the environment variable.
We expect the backup size to reduce dramatically upon update to Private Cloud 2.7.0. We hope this feature helps Private Cloud administrators manage their Private Cloud instances easily.
What this means for you
With AnyLogic Cloud 2.6.0–2.7.0, the workflow gets out of your way, so you can focus on decisions, not mechanics. Validate ideas faster, spot what’s working at a glance, and run more “what-if” checks without turning every update into a mini-project. The result is simpler experimentation for modelers, clearer outcomes for stakeholders, and less overhead for teams who manage the platform, whether you’re on SaaS or Private Cloud.
Ready to put it to work? Go and use AnyLogic Cloud: upload a model, run a few scenarios, and share the results with your team.