Have you ever wanted to interact with your running simulation model directly from your smartphone or feed real-time sensor data straight into your model’s decision-making logic?
In modern industrial environments, simulation models are no longer isolated sandboxes. They act as digital twins, requiring seamless, low-latency communication with physical assets, IoT devices, and control applications.
One of the most lightweight, robust, and popular protocols for this is MQTT. In this post, we’ll show you how to set up a local MQTT broker, connect an AnyLogic model to it using Java, and control your simulation in real time using a mobile app.
Contents:
- What is MQTT?
- How the integration works
- Step 1: Setting up the local MQTT broker
- Step 2: Preparing your AnyLogic model
- Step 3: Setting up the mobile dashboard
- Running and debugging
- What’s next?
What is MQTT?
MQTT stands for Message Queuing Telemetry Transport. It is a lightweight messaging protocol designed for communication between devices, applications, sensors, and control systems.
Despite the word “queuing” in its name, MQTT primarily uses a publish-and-subscribe architecture. Instead of sending information directly from one device to another, MQTT uses a central server called a broker.
The communication process looks like this:
- A device or application publishes a message.
- The message is sent to a specific topic.
- The MQTT broker receives the message.
- The broker forwards it to every application subscribed to that topic.
For example, a smartphone can publish the message ON to this topic:
anylogic/testmodel/buttonAn AnyLogic model subscribed to that topic receives the message and responds by injecting a new agent into the simulation. MQTT messages usually contain two main elements:
- Topic: The channel used to organize and route messages.
- Payload: The actual value being sent, such as ON, 42, or true.
MQTT is widely used in IoT and industrial systems because it requires relatively little network bandwidth and supports communication between many different types of devices and applications.
The architecture: how the integration works
Before diving into the code, let's look at the simple pub/sub (publisher/subscriber) architecture we are building. The system consists of three main components.
-
The broker: Eclipse Mosquitto
The broker acts as the central communication hub. It receives MQTT messages and forwards them to subscribed clients.
-
The subscriber: AnyLogic model
Subscribes to specific topics (e.g., anylogic/testmodel/button) and updates its parameters or triggers events when a new payload arrives.
-
The publisher: your smartphone
It sends control payloads (like ON or integer values) from the mobile app to the broker while also receiving simulation states to display on its dashboard.
Step 1: Setting up the local MQTT broker
For our message broker, we will use Eclipse Mosquitto, an open-source, highly lightweight MQTT broker.
Download and install Mosquitto from the official Mosquitto website.
By default, Mosquitto's default security configuration blocks external connections. To allow your mobile phone to communicate with the broker running on your computer, navigate to your Mosquitto installation directory (typically C:\Program Files\Mosquitto) and open mosquitto.conf in a text editor.
Then scroll to the bottom and add the following lines to open a listener port on all network interfaces and allow anonymous local connections:
listener 1883 0.0.0.0
allow_anonymous true
The first line tells Mosquitto to listen for MQTT connections on port 1883 using all available network interfaces. The second line allows clients to connect without a username or password.
Finally, save the file and restart the Mosquitto service via your OS services panel or terminal.
Step 2: Preparing your AnyLogic model
To handle MQTT communication, your model needs a Java MQTT client helper library. We will use the widely trusted Eclipse Paho client.
1. Adding the JAR Dependency
First, download the .jar library from the Eclipse Paho Downloads page.
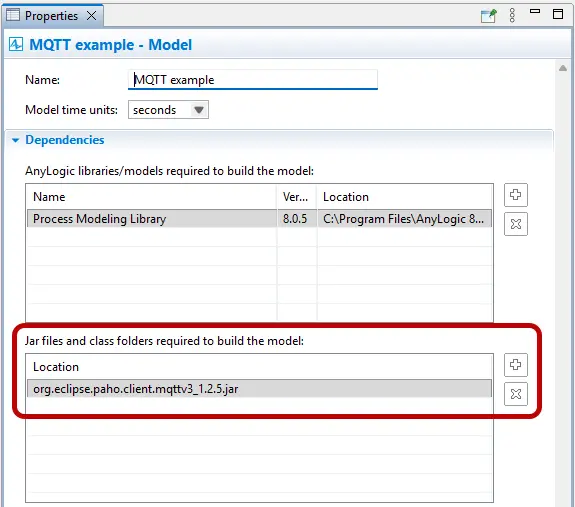
In AnyLogic, select your model in the Projects view, navigate to the Dependencies properties tab, and add the downloaded .jar file. This ensures AnyLogic can compile the MQTT client methods.
2. Establishing the connection
Create a custom function in your agent (e.g., Main). This function will initialize the client, target your broker host IP, and keep the session alive.
String clientId = "AnyLogic_" + System.currentTimeMillis();
mqttClient = new MqttClient("tcp://192.168.1.135:1883", clientId); // Initialize client (Replace IP with your broker machine's actual local network IP)
MqttConnectOptions options = new MqttConnectOptions();
options.setAutomaticReconnect(true); // VERY IMPORTANT: Reconnects automatically if the connection drops
options.setCleanSession(true);
options.setKeepAliveInterval(60);
mqttClient.connect(options);
3. Handling incoming messages
To act on messages sent from your phone, we define a listener inside the connection callback. The messageArrived() method intercepts payloads and triggers changes inside the running model.
Below is a snippet demonstrating how to inject a new agent into a Source block when a payload of ON is received. This allows you to generate virtual entities on demand with a button press on your phone!
@Override
public void messageArrived(String topic, MqttMessage message) throws Exception {
    String payload = new String(message.getPayload());

    // Check topic and payload
    if (topic.equals("anylogic/testmodel/button") && payload.equals("ON")) {
        source.inject(); // Triggers agent generation in Source block
        traceln("Agent injected successfully via MQTT signal!");
    }
4. Subscribing to topics
At the bottom of your function, make sure to explicitly subscribe to the topics you plan to control from your phone. For this example, we will control the model by interacting with a button, a slider, and a switch.
It makes sense to create separate topics for each control type:
// Subscribing to topics with QoS (Quality of Service) level 1
mqttClient.subscribe("anylogic/testmodel/button", 1);
mqttClient.subscribe("anylogic/testmodel/slider", 1);
mqttClient.subscribe("anylogic/testmodel/switch", 1);
Step 3: Setting up the mobile dashboard
To send commands from your phone, we use the IoT MQTT Panel app (available on iOS and Android by developer Rahul Kundu).
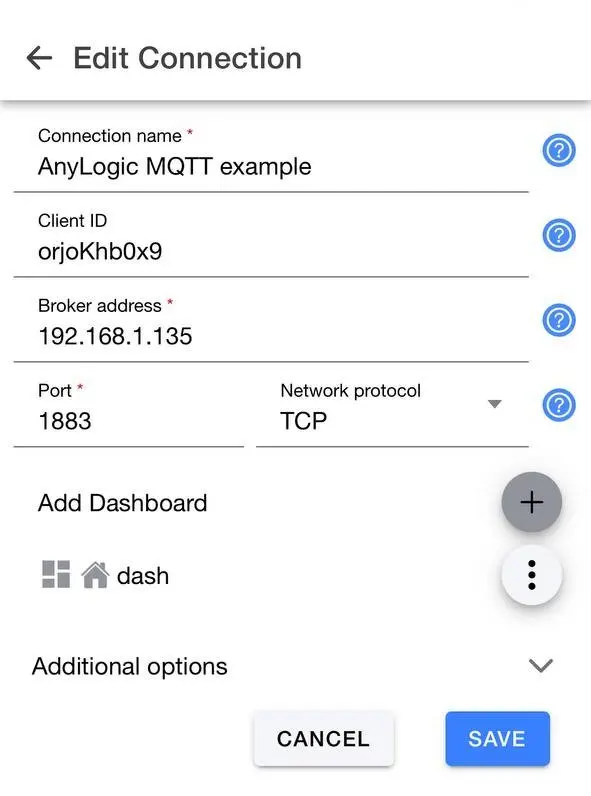
1. Create a new connection
Open the app, add a new connection, and name it.
2. Enter broker details
Use your host computer’s local IP address and port 1883.
Crucial: Ensure your phone and computer are connected to the exact same Wi-Fi network!
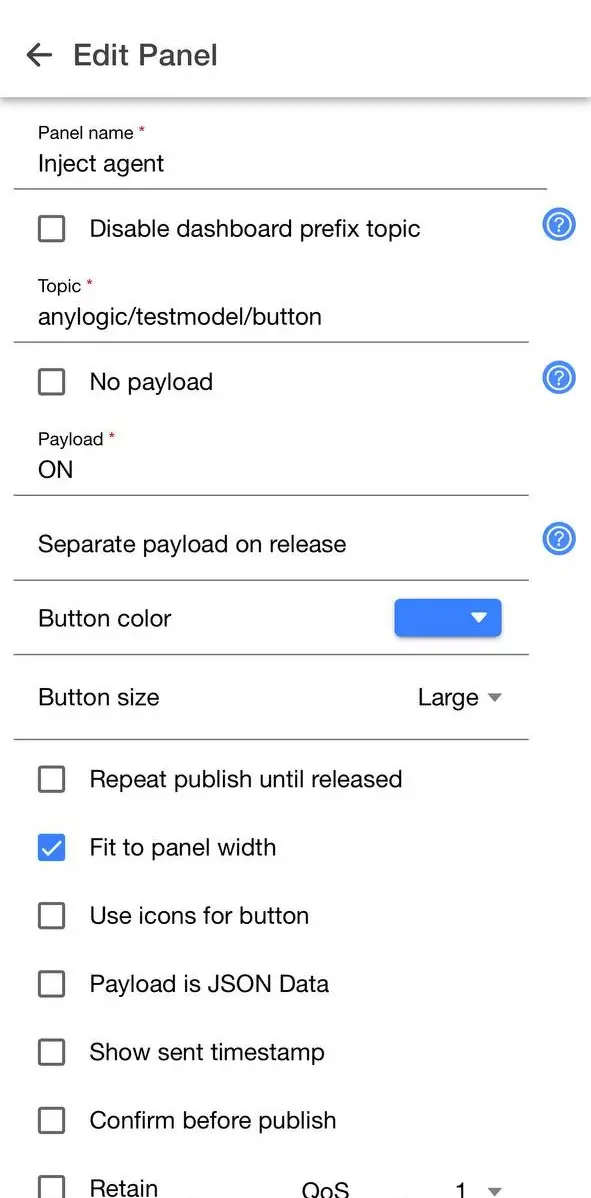
3. Create dashboard panels
Here is an example of a button that posts a payload for generating new agents.
Running and Debugging
Run your AnyLogic model, open the mobile dashboard, and watch your simulation react instantly as you slide and toggle controls on your phone!
If messages aren't getting through, you can easily sniff the traffic directly from your terminal to verify that the broker is receiving them. Run this command in your command line:
mosquitto_sub -h YOUR_BROKER_IP -t anylogic/testmodel/# -vTip: The # symbol is a wildcard that subscribes to all sub-topics under anylogic/testmodel/. The -v (verbose) flag prints the topic name alongside the incoming payload so you can easily spot where communication is dropping.
Here is a quick demo of this integration in action.
Explore the complete setup in AnyLogic by downloading the example model and testing the MQTT connection firsthand.
What's next?
While controlling a simulation from a phone is a useful proof of concept, this architecture has massive industrial implications.
In Part 2 of this series, we’ll move beyond manual user inputs and explore how to send real-time data from physical sensors directly into AnyLogic. The model will then use this data to influence its decision-making logic while the simulation is running.
Stay tuned to our Blog page so you don't miss the next part!